
Lower anterior dental implant therapy can be a challenging and highly detail-oriented endeavor. These challenges can include aspects such as bone and tissue volume deficiencies, implant positioning, and restorative designs/contours. We as clinicians have the very best chance to complete acceptable surgical-prosthetic esthetic results in this area, through proper treatment planning and implant positioning.
Implant osteotomy creation has always involved the use of sequential burs spinning at high speeds while being cooled with saline or other liquids. The heat generated in this process has been theorized to be one of the main reasons clinicians wait 3-6 months before restoring a surgically placed implant.
This article will discuss lower anterior implant therapy utilizing a novel implant system that utilizes an innovative and minimally invasive process in creating an implant osteotomy which may lead to increased predictability and decreased wait times for final implant restorations.
Innovative osteotomy creation
Clinicians have been trained to expect a decrease in initial stability approximately 3-5 weeks after implant placement.1,2 This has been conceived to be caused by friction/trauma and related heat generation during the drilling process of creating an osteotomy via conventional means. As a result, most clinicians wait anywhere from three to six months to load the implant with a final restoration that is torqued to the manufacturer’s specifications.
A novel implant system (N1™ Nobel Biocare) has introduced a revolutionary 3-step implant placement process of “shape, direct, place” which is designed to reduce hard tissue trauma and protect the biology of the surgical site through utilizing only 2 minimally invasive steps to create the final osteotomy.3
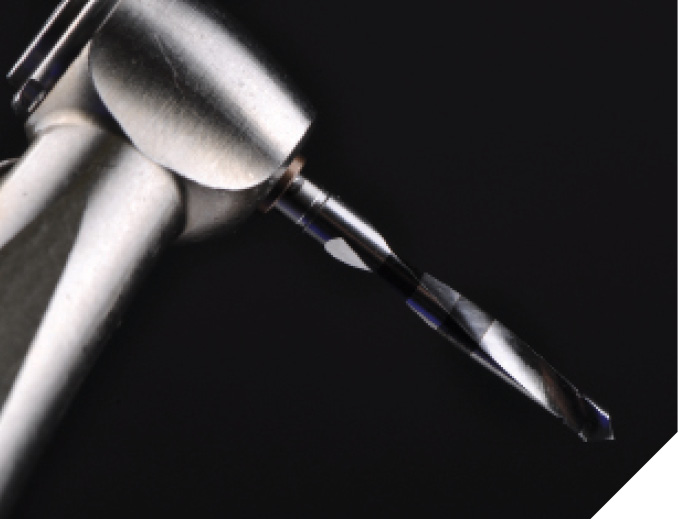
Step 1 – Direct: Establishing Osteotomy trajectory via the OsseoDirector™
Most of the implant osteotomies for this novel implant system (N1™ Nobel Biocare) only require two surgical steps. The OsseoDirector™ is the first and only bur utilized to create the initial osteotomy. It works like a conventional implant surgical bur and runs at 1000-2000RPM under irrigation. It is utilized to set the overall trajectory of the desired implant osteotomy. (Fig. 1)
Fig. 1
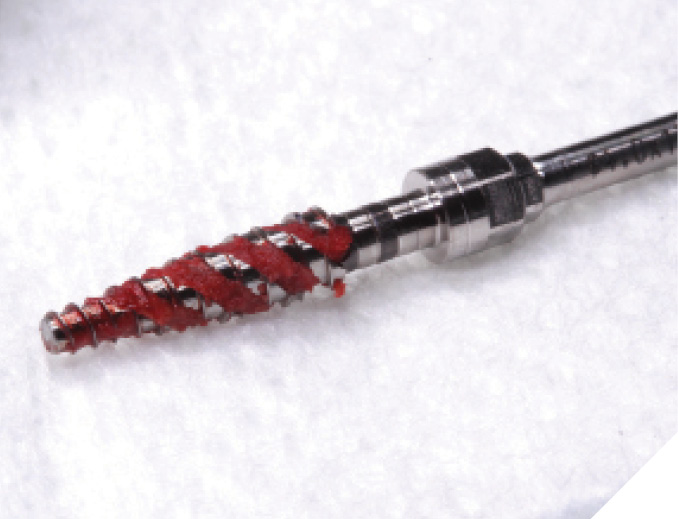
Step 2 – Shape: Creating the final osteotomy with the OsseoShaper™
After the trajectory of the initial osteotomy created by the OsseoDirector™ has been verified with a periapical radiograph. The desired length/width of implant is selected and opened. Each implant for this novel implant system (N1™ Nobel Biocare) comes with a special customized tool call the OsseoShaper™. (Fig. 2) which shapes the final osteotomy right from the initial hole made by the OsseoDirector™. This is revolutionary as no other implant surgical burs running at high speeds with irrigation are needed. The OsseoShaper™ is packaged with every implant and acts as a coring instrument that forms the final dimensions of the osteotomy to accept the dental implant it is packaged with. The OsseoShaper™ is designed to follow the exact trajectory created in Step 1 by the OsseoDirector™. As a result, it is imperative that the initial osteotomy created by the OsseoDirector™ is thoroughly inspected and verified by a radiograph.
Fig. 2
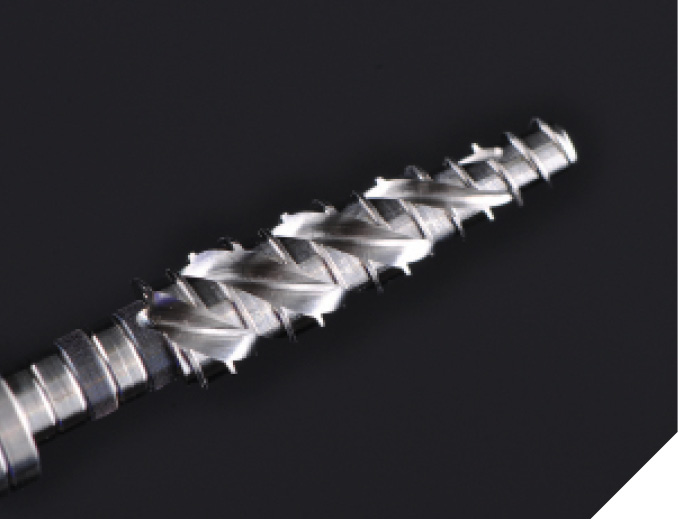
The OsseoShaper™ operates at very low speeds (40-60 RPM) with no irrigation. As a result, far less heat and trauma is generated compared to conventional drilling, which may lead to lead to faster osseointegration and less of a stability dip at weeks 3-5 after placement. (Fig. 3)3-6
Fig. 3
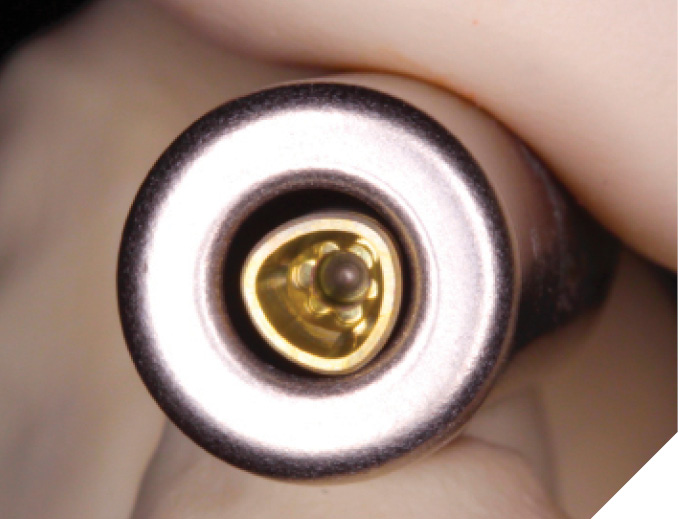
Step 3 – Place: Placement of the Novel Tri-Oval Conical Implant
After the final osteotomy has been created by the OsseoShaper™, the novel implant system (N1™ Nobel Biocare) is now placed. This new implant system has a unique trioval conical connection7 and is anodized with an innovative surface conditioning called TiUltra™ which is the only surface conditioning available that has multiple different zones of roughness. The implant is placed at the desired depth according to the case. (Fig. 4)
Fig. 4
The N1 Base: “One Abutment, One Time” Concept
The most important component of a dental implant restorative complex is the implant-abutment connection. This is where forces and bacteria may lead to bone/tissue remodeling. The adherence of soft tissue to components in this area has been shown to occur, and it has also been demonstrated that there may be great benefits in bone/tissues levels if this area is not disturbed after an abutment is placed and torqued into the implant.8-9
It has been postulated that the placement of a final abutment on the day of surgery or surgical uncovery may provide favorable outcomes. However, this has remained difficult to do unless the final restorations were cement-retained in design. As a result, a novel restorative abutment platform was designed for this novel implant system (N1™Nobel Biocare) to seal the implant-abutment connection off on the day of surgical placement or uncovering and yet permit the placement of screw-retained final restorations. (N1 Base – Nobel Biocare) (Fig. 5)
Fig. 5
Lower incisor implant therapy
Lower anterior implant therapy can be very challenging mostly due to the small size of the lower incisors that need to be replaced. This makes the placement of adjacent implants almost impossible in most cases. Furthermore, if a single lower incisor is lost and replaced by an implant that is 3mm wide or less, it may not be able to be utilized in implant supported bridgework if other lower incisors are lost in the future. As a result, it is very important that when looking to replace lower incisors, all 4 lower incisors are properly and thoroughly assessed for longevity and long-term prognoses prior to placing any dental implants. The most ideal implant placement positioning to replace 4 lower incisors would be to place implants in the lateral incisor positions to support a 4-unit implant bridge. This allows for maximum spacing of implants for blood supply, as well cleanseability. Symmetrical implant placement in terms of position allows for more predictable esthetics and pontic designs/tissue amounts. Another point to understand is that if a lower central incisor is lost, but the remaining 3 lower incisors are stable, it may be more advantageous to complete tooth borne FPD instead of a single central incisor implant.
Case Reports: Lower incisor implant cases utilizing new innovations
The following case reports will showcase the utilization of all the concepts described above to treat patients with failing lower incisors in much shorter treatment times.
Case 1 – Hopeless Mandibular Incisors – Immediate Placement and Grafting
A 65-year-old patient presented with the chief complaint of mobile lower incisors.
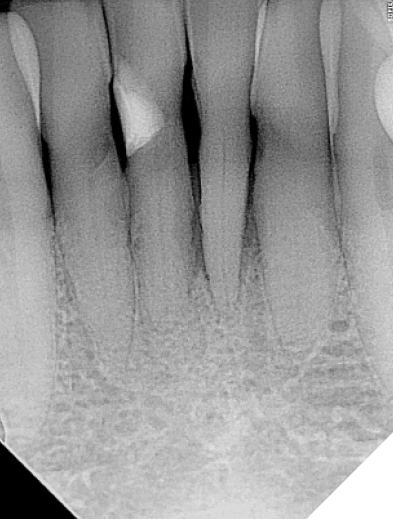
Radiographic and clinical evaluation of teeth 32-42 revealed Grade 2 mobility and deep pocketing. Advanced attachment loss leading to poor crown-root ratios were also evident. These teeth were determined to have poor-hopeless long-term prognoses. (Figs. 6-7) The clinical solution selected was to extract the lower incisors and immediately place dental implants in the 32 and 42 positions with simultaneous osseous grafting. He was informed of the novel implant design now available with the proposed benefits of possible shorter treatment times and was excited to have them utilized.
Fig. 6
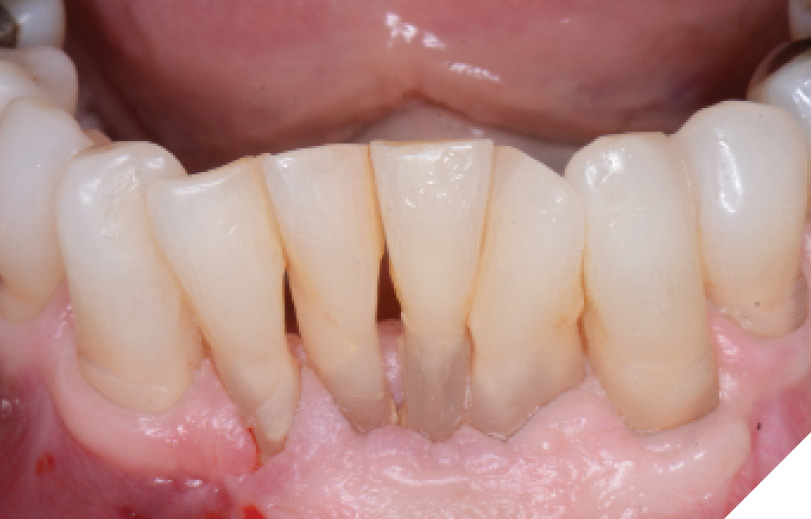
Fig. 7
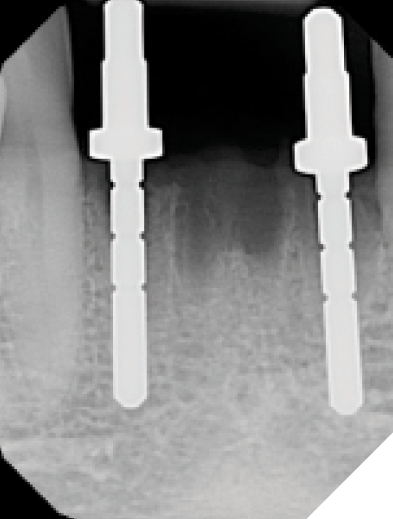
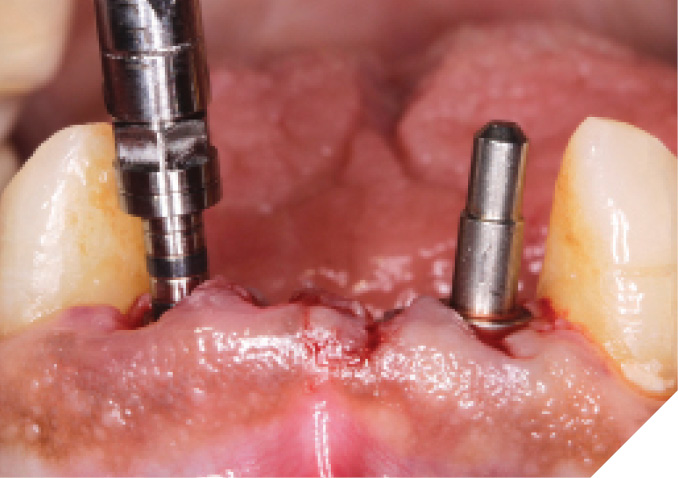
The lower incisors were atraumatically extracted, and the sockets were thoroughly debrided and flushed. The socket classifications were found to be type 1 and type 2 sockets. (Fig. 8) The initial osteotomies were created using the OsseoDirector™ under saline irrigation. Directional indicators were placed, and a radiograph was taken to assess the proposed osteotomy trajectories. (Figs. 9-10) The implants were then opened and the included OsseoShaper™ tools were utilized to prepare the final osteotomy dimensions at very low speeds and no irrigation. Osseous xenograft (Creos – Nobel Biocare) bathed in concentrated platelet rich plasma and L-PRF were then placed into the socket and compressed against the walls of the socket.
Fig. 8

Fig. 9
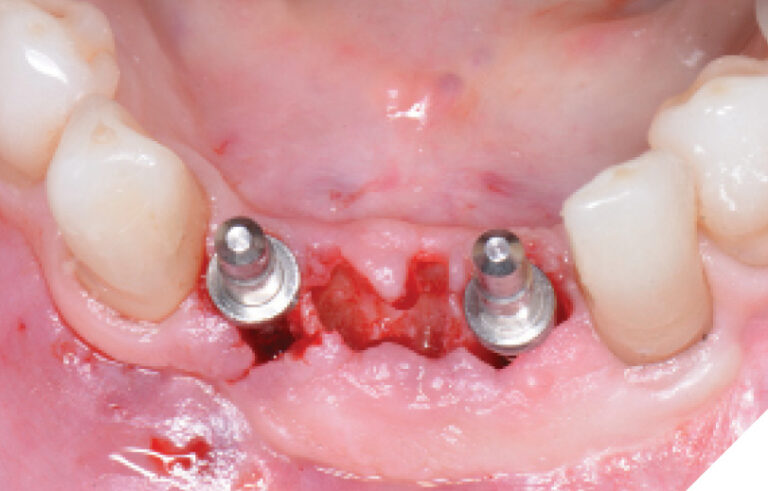
Fig. 10
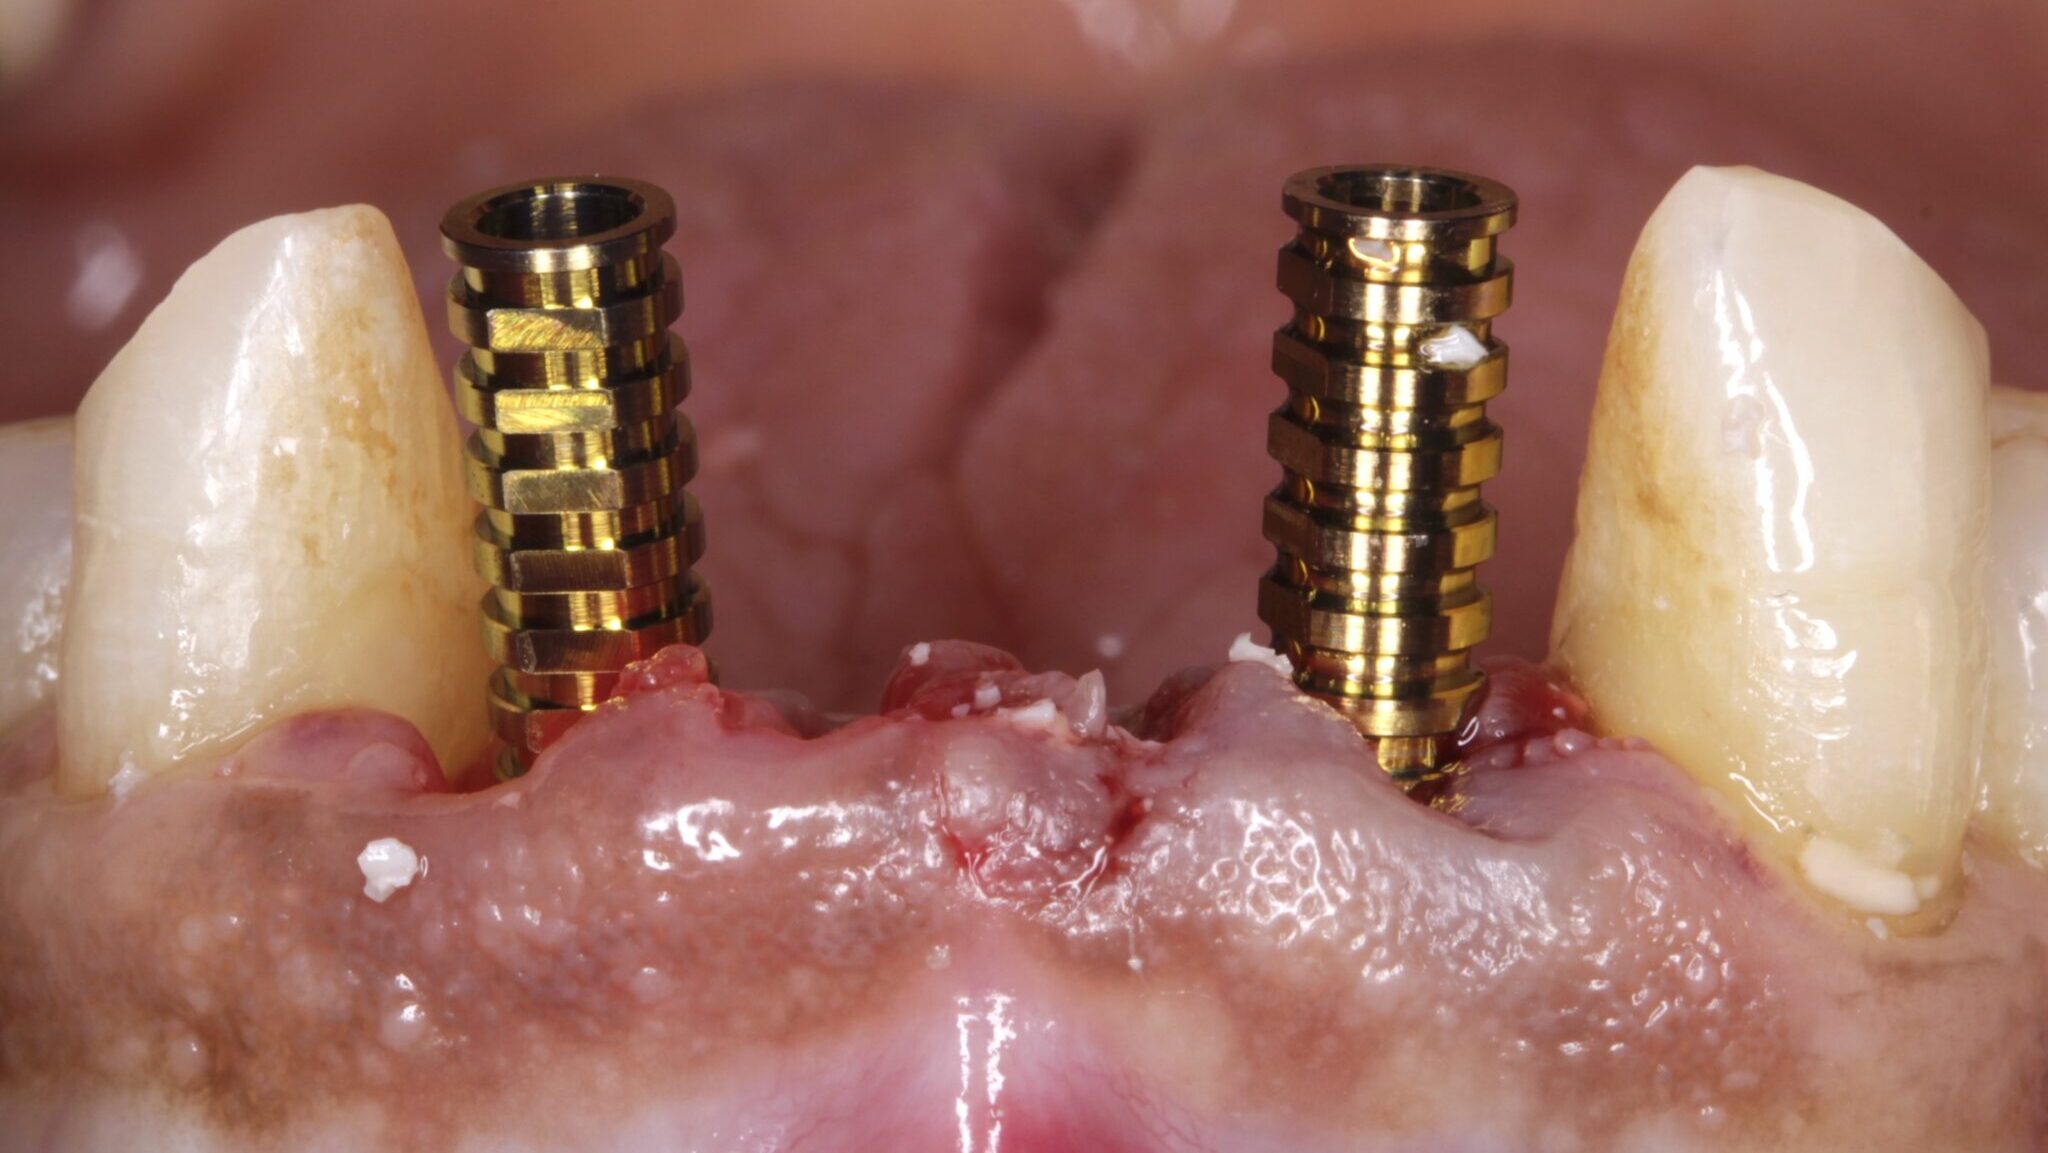
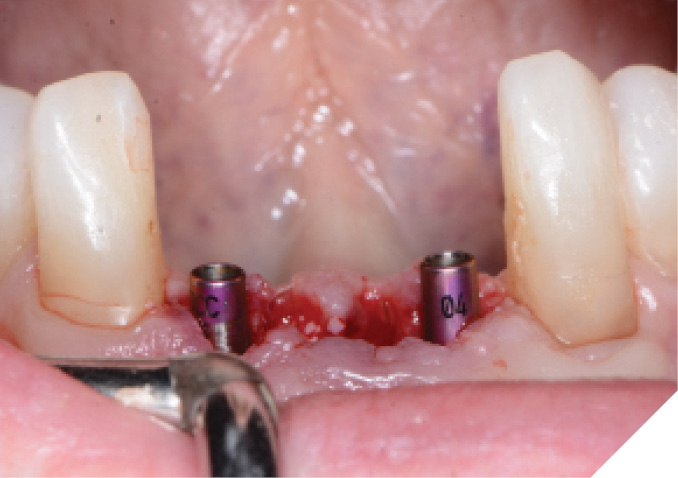
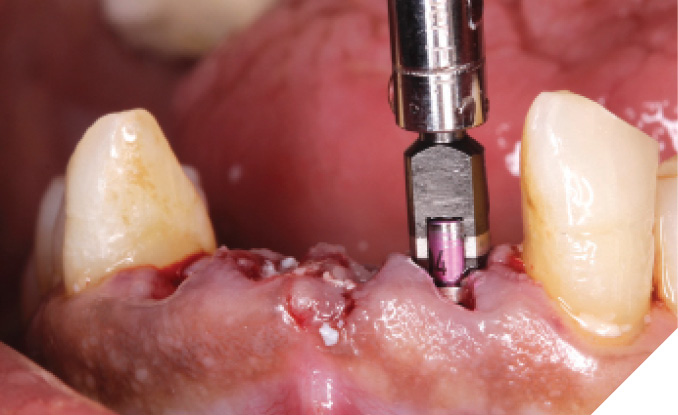
The narrow platform trioval conical connection implants (3.5 x 11mm (NP)) were then placed 3 mm apical and 2–3 mm palatal from the proposed gingival zenith of the desired final restoration. (Fig. 11) Initial stability of >35 Ncm was attained for both implants sites and then bone milling was completed using a mill specific to this implant system in order to remove any bone or debris above the implant connection that would impinge on proper seating of the restorative components. (Fig. 12)
Fig. 11
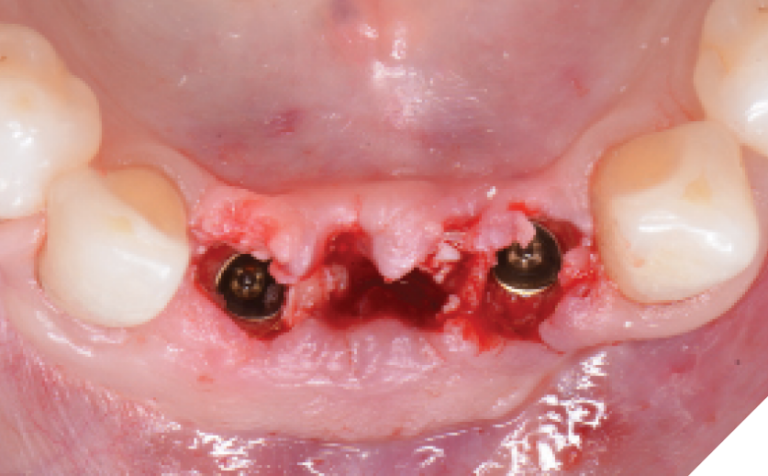
Fig. 12
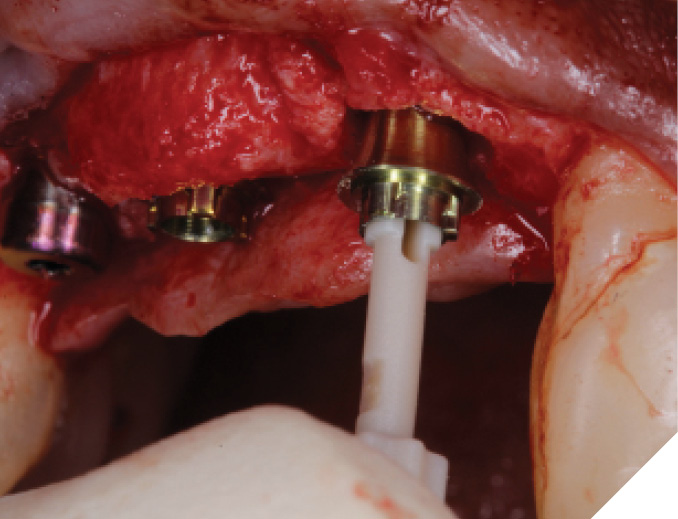
The N1™ bases (1.75mm height) were then seated into the implants and torqued to specifications (20Ncm). (Fig. 13) PEEK healing caps were then screwed down onto the bases which also act as IOS impression copings. (Fig. 14) Further osseous grafting was completed as well as the placement of a membrane (Creos – Xenoprotect). The site was then sutured closed, and a bonded provisional bridge was placed to act as a temporary during healing. (Figs. 15-18)
Fig. 13
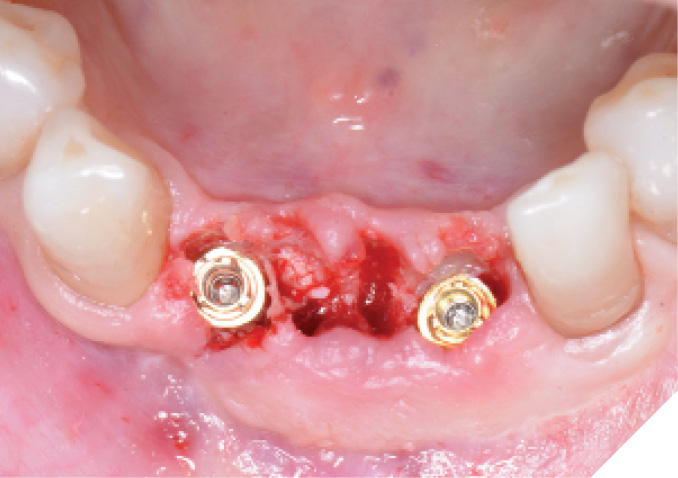
Fig. 14
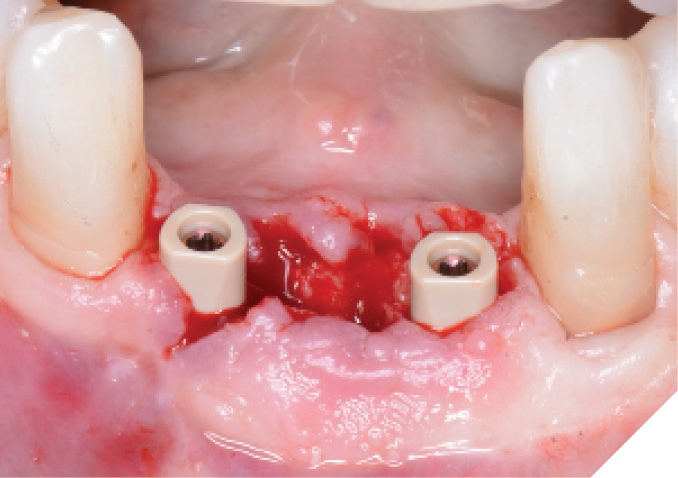
Fig. 15
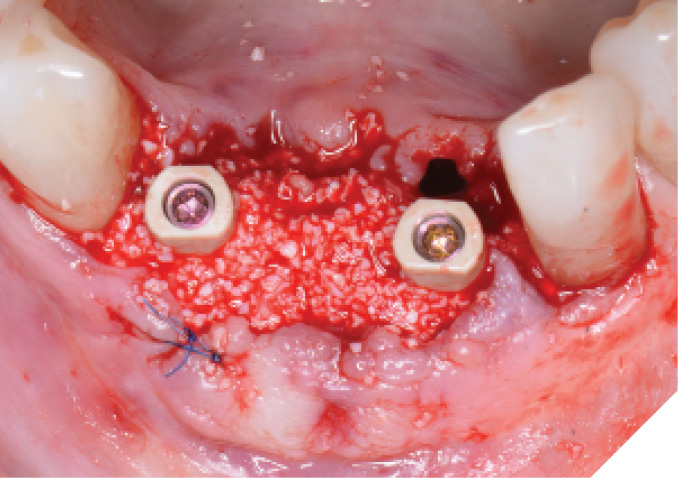
Fig. 16
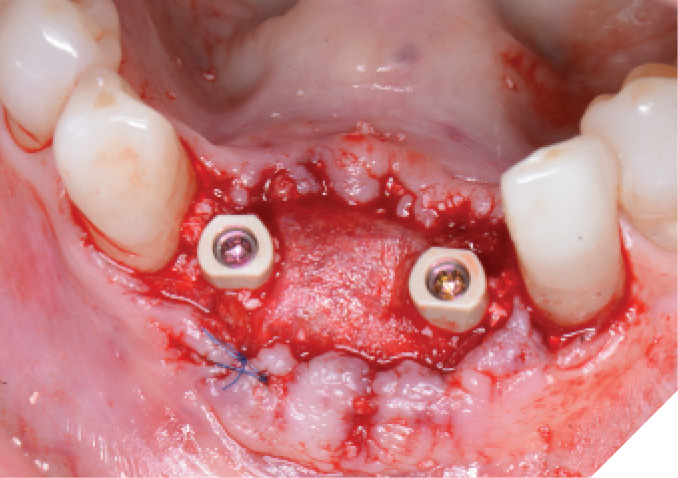
Fig. 17
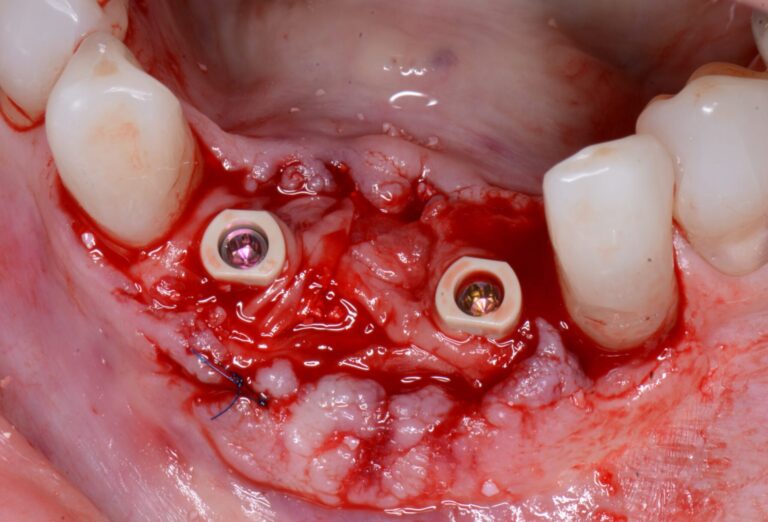
Fig. 18
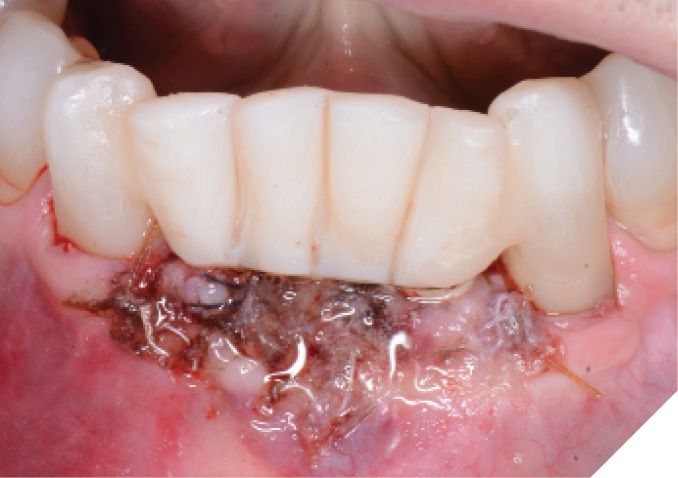
The area was assessed after 2 weeks of healing, the surgical site showed exceptional soft tissue healing and the patient noted virtually no discomfort over the past two weeks. (Fig. 19)
Fig. 19
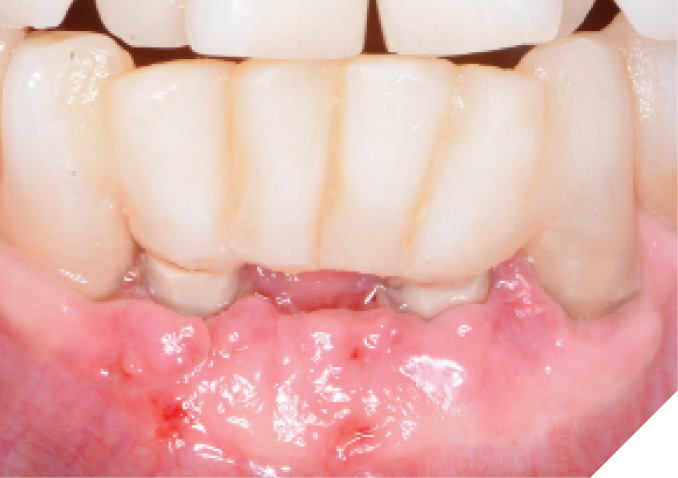
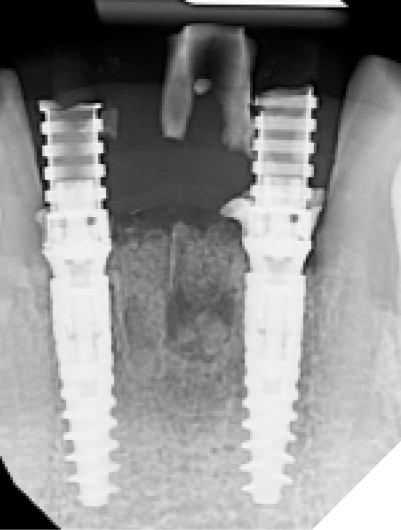
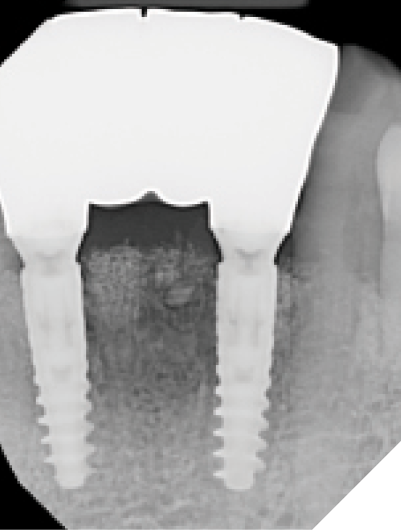
At the 6-week healing point, the N1™ Base were again torqued to specifications (20 NCm) to evaluate stability of the implants, and no issues were found. An IOS final digital impression was taken of the existing IOS healing caps, The final screw-retained monolithic zirconia (ZirCad Prime, Ivoclar Vivadent) bridge was seated 2 weeks later, onto the N1 Bases and torqued to specifications (20 Ncm). Occlusion, proximal contacts, esthetics and phonetics were all verified to be ideal for the patient. The access holes of the final bridge were then filled with Teflon tape and flowable composite and a final periapical radiograph was taken. (Figs. 20-22)
Fig. 20
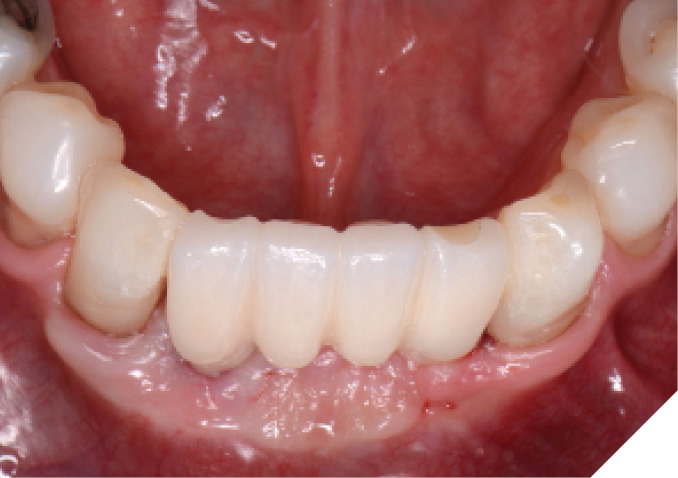
Fig. 21
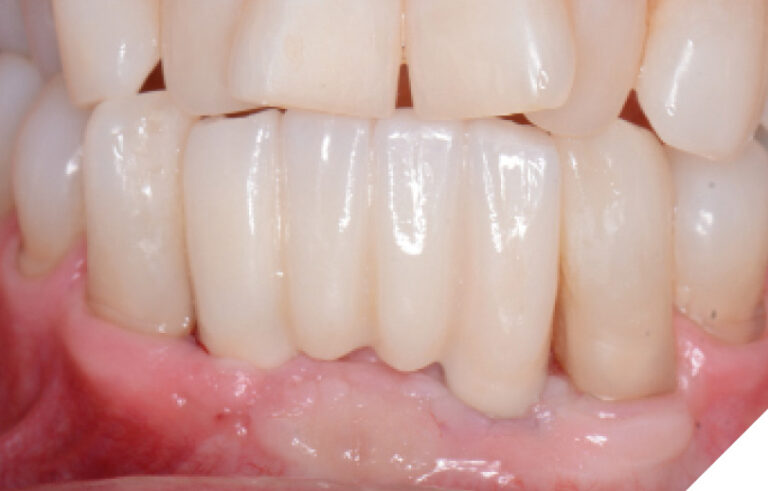
Fig. 22
Over the next year, the stability and healing of the implant sites were monitored, and all appeared to be stable and well.
Case 2 – Hopeless Mandibular Incisors – Immediate Placement and Loading
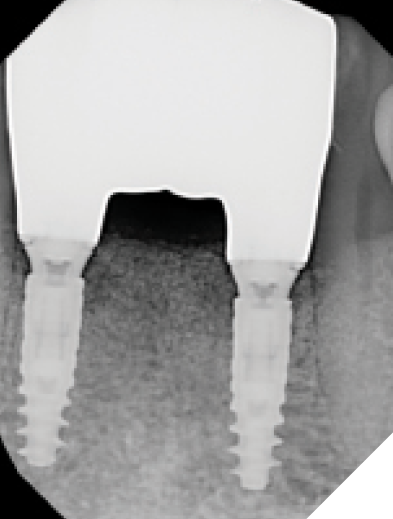
A 75-year-old patient presented with the chief complaint of pain and mobility in the lower incisor region. Radiographic and clinical evaluation of the lower incisors revealed Grade 2-3 mobility, periapical radiolucencies, and deep pocketing. These teeth were determined to have poor-hopeless prognoses and were planned for extraction. (Figs. 23-25)
Fig. 23
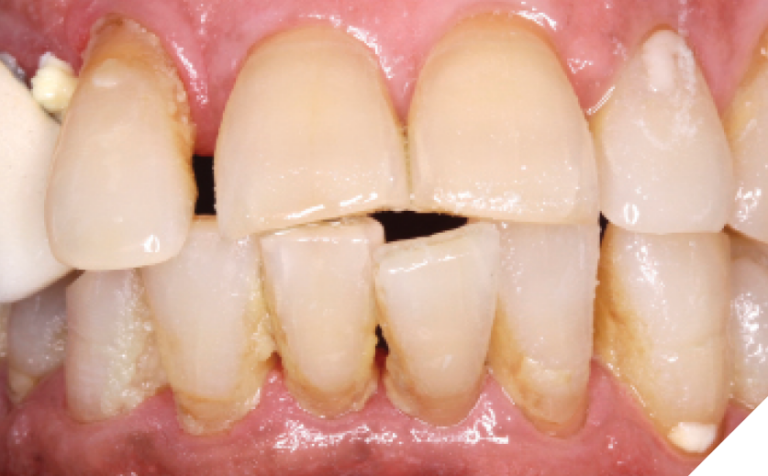
Fig. 24
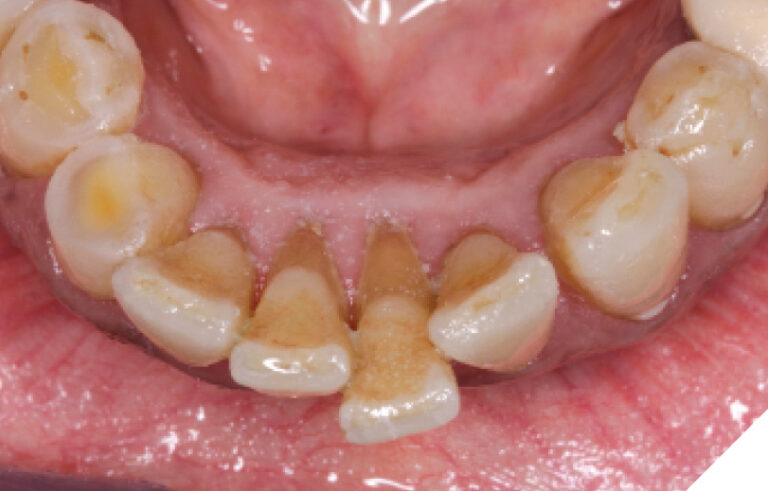
Fig. 25

The patient agreed to have these teeth removed and replaced with a 32-42 implant supported bridge utilizing the novel implant system that may decrease the treatment time for her.
Teeth 32-42 were extracted and the sockets were thoroughly debrided and flushed. The sockets were found to be type 1 and type 2 sockets. (Fig. 26) The initial osteotomies were created using the OsseoDirector™ and directional indicators were placed and a radiograph was taken. (Fig. 27) The implants were opened and the OsseoShaper™ tools were employed to formulate the definitive osteotomy sizes. (Fig. 28) Osseous xenograft (Creos – Nobel Biocare) bathed in concentrated platelet rich plasma and L-PRF were then placed into the socket and compressed against the walls of the socket prior to implant placement.
Fig. 26
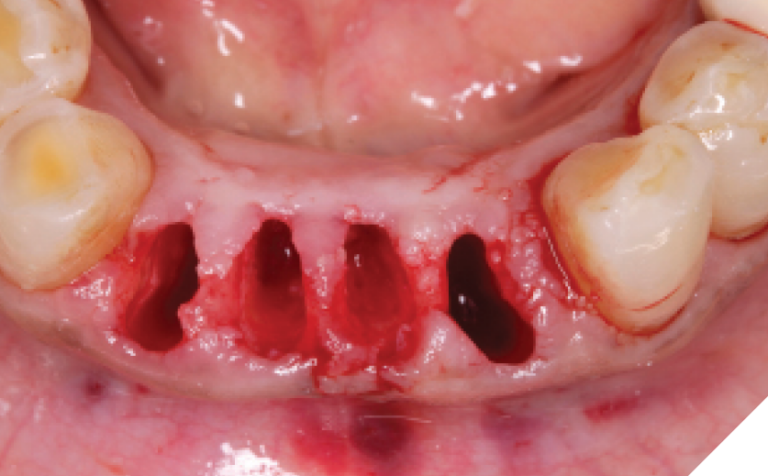
Fig. 27

Fig. 28
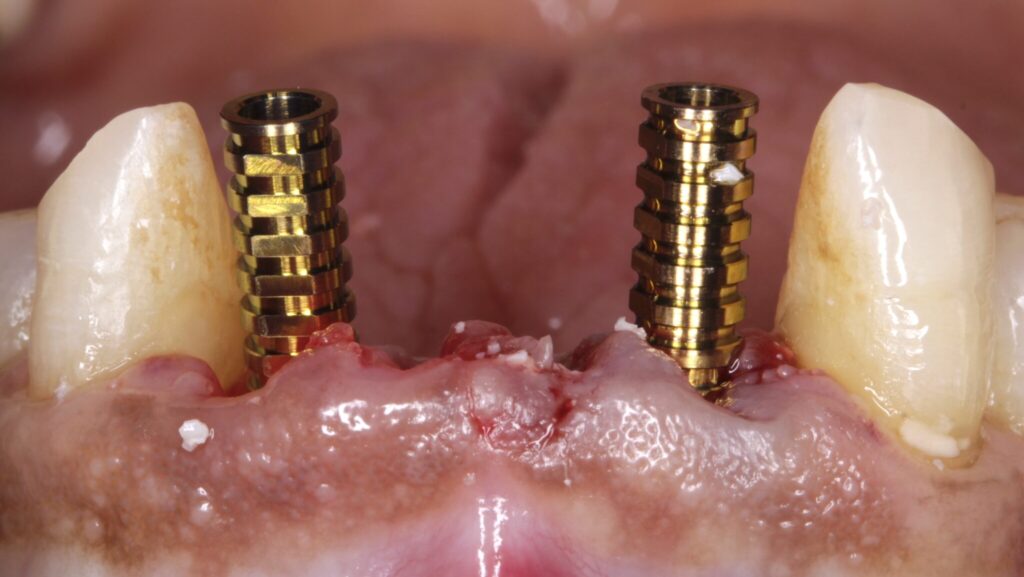
The narrow platform trioval conical connection implants (3.5 x 11mm (NP)) were then placed. (Figs. 29-30) Initial stability of >35 Ncm was attained and bone milling was completed. (Fig. 31)
Fig. 29
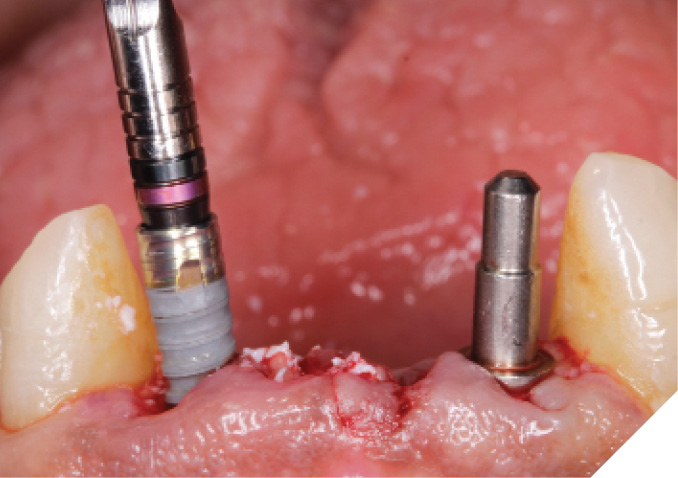
Fig. 30
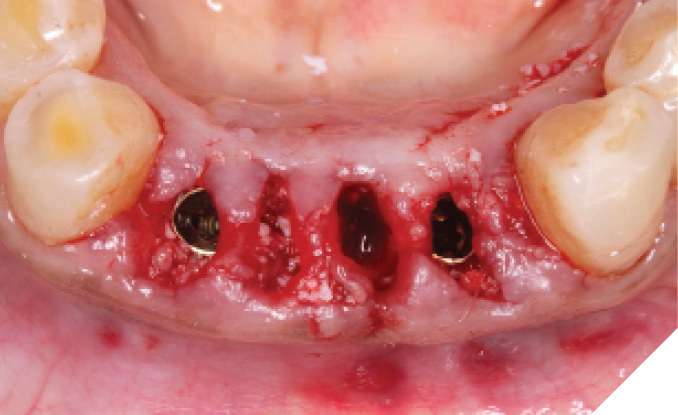
Fig. 31
The N1™ bases (1.75mm height) were seated into the implants and torqued to specifications (20Ncm). (Fig. 32) The site was then sutured after further osseous grafting was completed. A screw-retained provisional bridge was fabricated chairside and torqued to specifications (20 NCm). Occlusion was refined. (Figs. 33-35)
Fig. 32
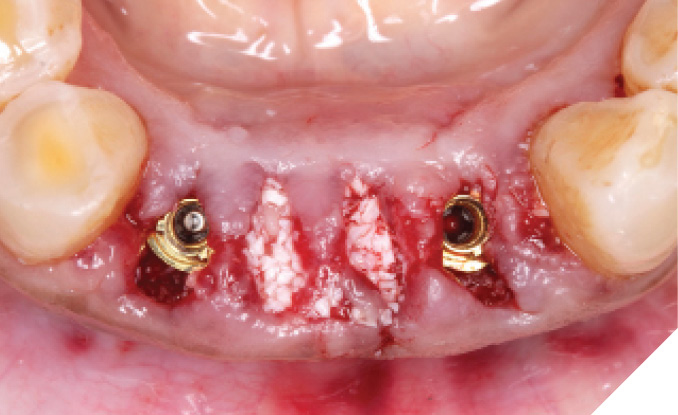
Fig. 33
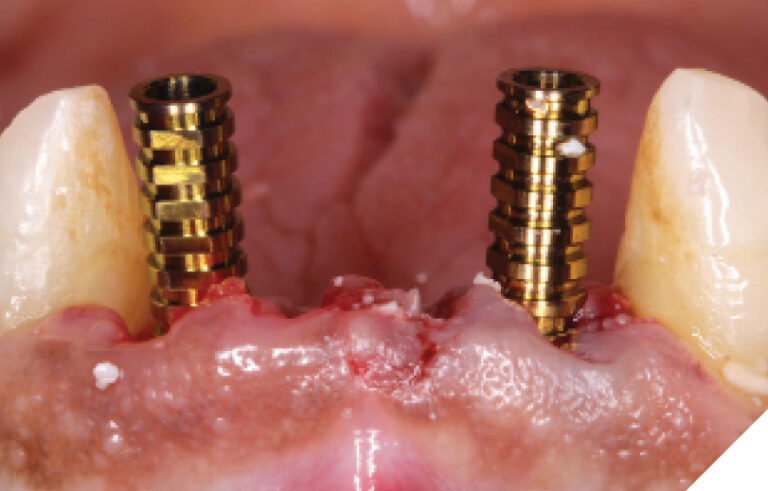
Fig. 34
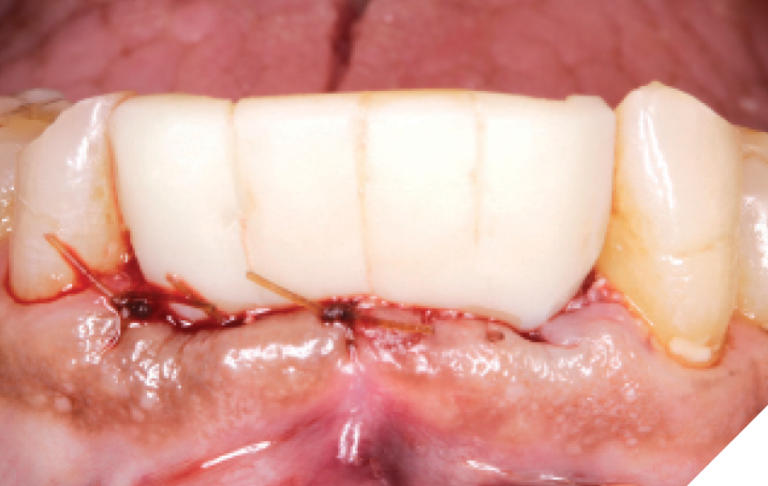
Fig. 35
At the 6-week healing point, the N1™ Base were torqued to specifications (20 NCm) to validate implant integration, and a closed tray impression was taken of the implants. (Fig. 36) A final screw-retained monolithic zirconia (ZirCad Prime, Ivoclar Vivadent) bridge was seated at the 8-week post-operative appointment and torqued to specifications (20 Ncm). Occlusion, proximal contacts, esthetics and phonetics were confirmed prior to filling the access holes. (Figs. 37-39)
Fig. 36
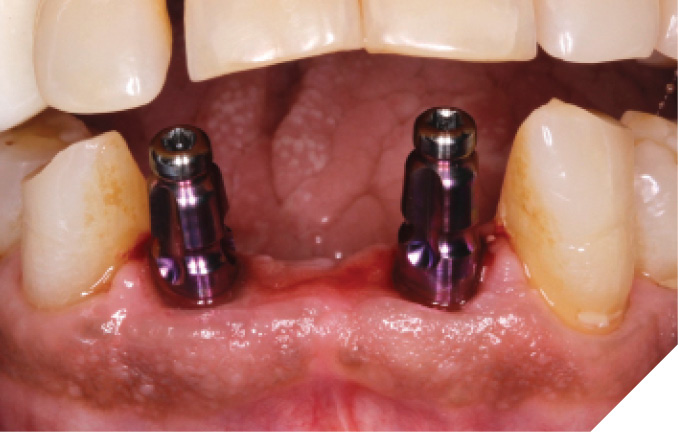
Fig. 37
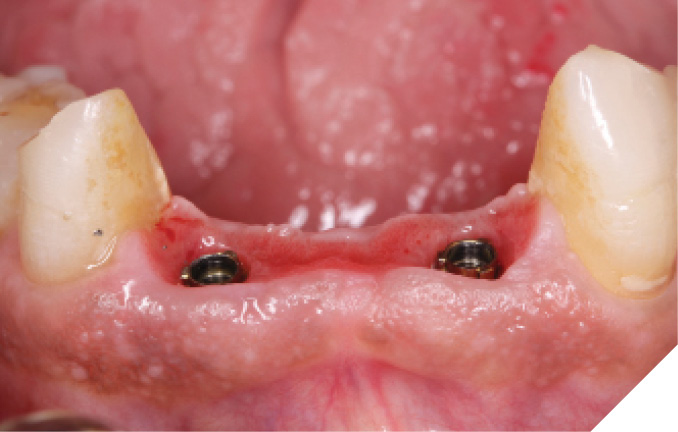
Fig. 38
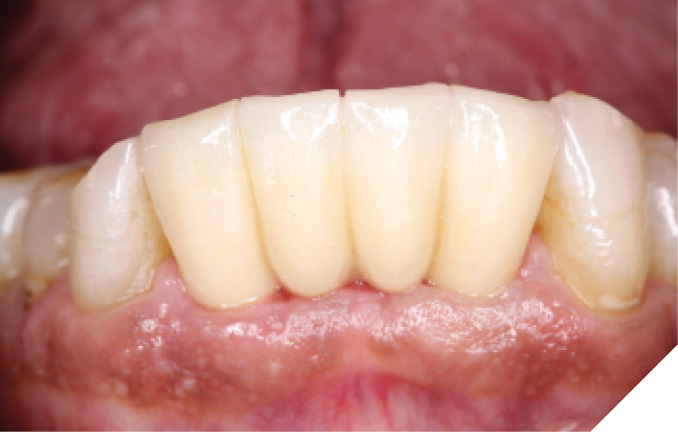
Fig. 39
The healing/stability of the implant supported bridge was monitored over the next year and all appeared stable and well.
Conclusion: Benefits of decreased treatment time for lower anterior
These 2 cases demonstrate the potential benefit of utilizing this novel implant system with its innovative minimally invasive osteotomy creation protocol. Both cases benefitted from significantly decreased time to their final teeth (8 weeks). The benefits of utilizing this new implant system are clear. 
Oral Health welcomes this original article.
References
- Edmara T. P. Bergamo, Abbas Zahoui, Raúl Bravo Barrera, Salah Huwais, Paulo G. Coelho, Edward Dwayne Karateew, Estevam A. Bonfante. Osseodensification effect on implants primary and secondary stability: Multicenter controlled clinical trial. Clin Implant Dent Relat Res. 2021 Jun; 23(3): 317–328.
- Ho-Kyung Lim, Sung-Jae Lee, Yujin Jeong, Jong-Seok Lee, Jae-Jun Ryu, Ji-Suk Shim, In-Seok Song. Clinical Validation of Dental Implant Stability by Newly Designed Damping Capacity Assessment Device during the Healing Period. Medicina (Kaunas) 2022 Nov; 58(11): 1570.
- Chen CH, Coyac BR, Arioka M, et al. A Novel Osteotomy Preparation Technique to Preserve Implant Site Viability and Enhance Osteogenesis. J Clin Med. 2019;8(2):1-13.
- Zemp J, Velikov S, Weißbrot S, et al. New Low-speed Site Preparation Protocol Significantly Reduces Noise. J Dent Res. 2020;99 (Spec Iss A):3053
- Limmeechokchai S, Kan JY, Rungcharassaeng K, Goodacre CJ, Lozada J, Oyoyo U. Heat and Sound Generation During Implant Osteotomy When Using Different Types of Drills in Artificial and Bovine Bone Blocks. J Oral Implantol. 2022 Jun 1;48(3):187-193.
- Bahat O, Yin X, Holst S, Zabalegui I, Berroeta E, Pérez J, Wöhrle P, Sörgel N, Brunski J, Helms JA. An Osteotomy Tool That Preserves Bone Viability: Evaluation in Preclinical and Clinical Settings. J Clin Med. 2022 Apr 30;11(9):2536.
- Velikov S, Camenzind M, Fabech J, et al. Stability of a New Trioval Implant in Bone Surrogate Model. J Dent Res. 2020;99 (Spec Iss A):3052.
- Degidi M1, Nardi D, Piattelli A. One abutment at one time: non-removal of an immediate abutment and its effect on bone healing around subcrestal tapered implants. Clin Oral Implants Res. 2011 Nov;22(11):1303-7.
- Perrotti V, Zhang D, Liang A, Wang J, Quaranta A. The Effect of One-Abutment at One-Time on Marginal Bone Loss Around Implants Placed in Healed Bone: A Systematic Review of Human Studies. Implant Dent. 2019 Aug 1.
About the Authors

Dr. Bobby Birdi is a board-certified dual specialist in Periodontics & Prosthodontics. Bobby is presently the co-founder of the Digital Dentistry Institute and maintains a full-time private practice at the Imperio Dental Health Specialists and the BC Perio Dental Health & Implant Centres in Vancouver.

Angus Barrie started working with his father at a young age and has been a registered technician for more than 30 years. He is currently the laboratory manager for the BC Digital Dental Studio which is the main lab for BC Perio.

Catherine Chay is a certified dental assistant with over 15 years of experience in dental implantology. She is involved in both teaching and mentoring her fellow assistants and is currently the clinical manager of the BC Perio Dental Health & Implant Centres in Vancouver.

Dr. Felipe Ouriques is a distinguished professional in the field of dentistry, specializing in implantology and periodontics. He earned his DMD and completed his MS in Implantology at the Federal University of Santa Catarina. He is currently in a periodontics residency program at the University of Alabama.