

Treatment of a severe Class II, division 1 malocclusion with a deep impinging bite using Invisalign aligners with precision wings.
Patient
Age: 11 year, 8 month-old male
Chief concern: Upper front teeth sticking out
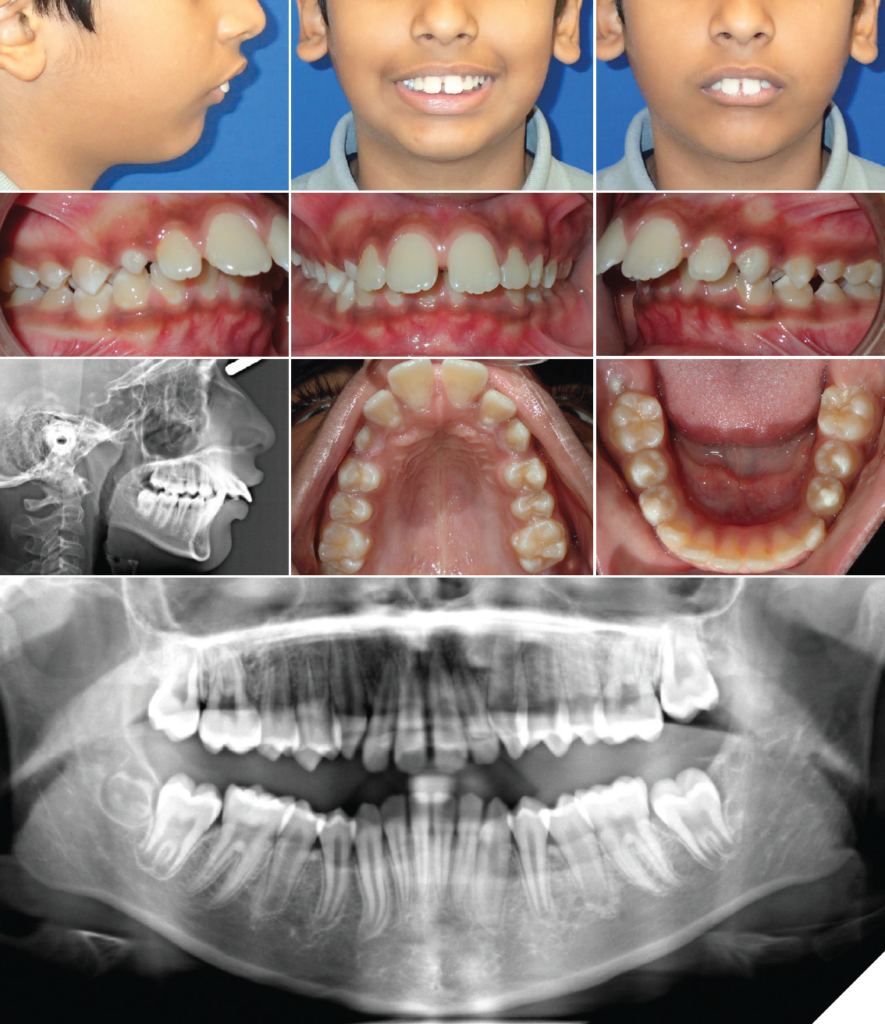
Diagnosis:
- Permanent dentition
- Convex facial profile
- Severe Class II, division 1 bite relationship on the right and left side
– 11-12 mm overjet
– Retrognathic mandible
– Protruded upper and lower incisors - Deep impinging bite (8 mm overbite)
- Moderate upper anterior spacing with a midline diastema
- Mild lower anterior spacing
- Agenesis of UR8, UL8, and LL8
Cephalometric values:
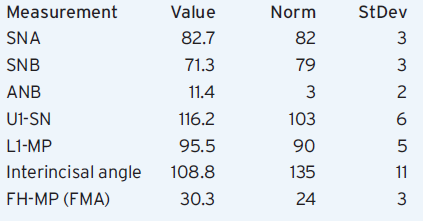
Figs. 1-10
Treatment goals
- Correct the bite to Class I molar and canine without extractions.
- Reduce the incisor proclination.
- Close all the spaces.
- Correct the deep bite.
- Maintain good oral hygiene during and after orthodontic treatment.
Treatment Plan
- Open the bite with an initial series of Invisalign aligners (pre-mandibular advancement phase).
- Begin to retract and upright the upper incisors during this pre-mandibular advancement phase, using Class II elastics for maximum anchorage.
- Advance the mandible using aligners with precision wings (no interarch elastics).
- Detail and finish with additional aligners as needed.
- Retain the teeth with a bonded lingual wire on upper 2-2 and lower 3-3. Add a clear retainer for night-time wear to the upper arch around 45 days later, once the teeth have settled and the occlusion has stabilized. Form lingual bite ramps into the upper clear retainer if deep bite relapse is noted.
Invisalign aligner features used
- Eruption compensation feature for the permanent upper right canine.
- Optimized and conventional attachments.
- Precision cut-outs for the lower first molars (during the pre-MA phase only).
- Precision wings for mandibular advancement.
- Precision bite ramps (during the additional aligners phase for detailing).
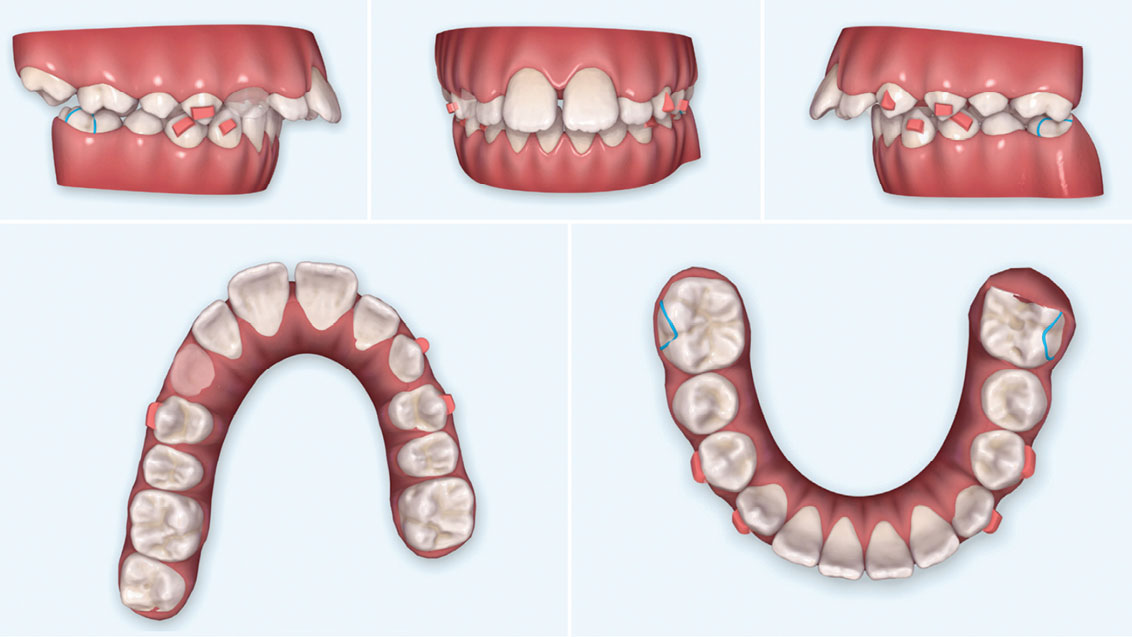
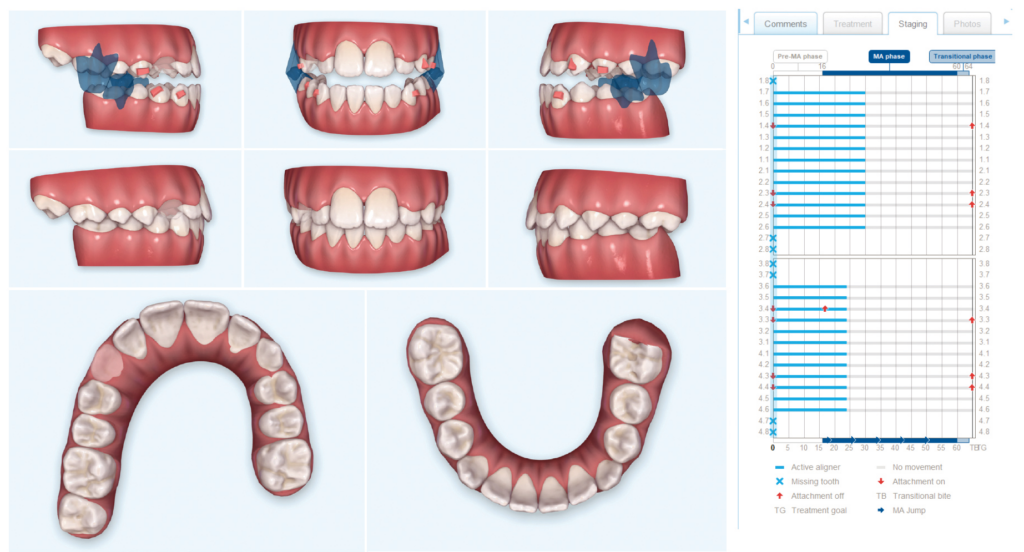
ClinCheck® software set-up and staging
The pre-mandibular advancement aligner phase was designed to level the lower arch to reduce anterior interferences before initiating mandibular advancement. In the upper arch, the molars were derotated and the incisors retracted, intruded, and uprighted. During the mandibular advancement phase, the incisor retraction and arch leveling continues, to avoid anterior interferences while the overjet is being corrected. Precision bite ramps for vertical control can be added to the upper aligners once the overjet is sufficiently reduced.
Figs. 11-15: Pre-mandibular Advancement Goal
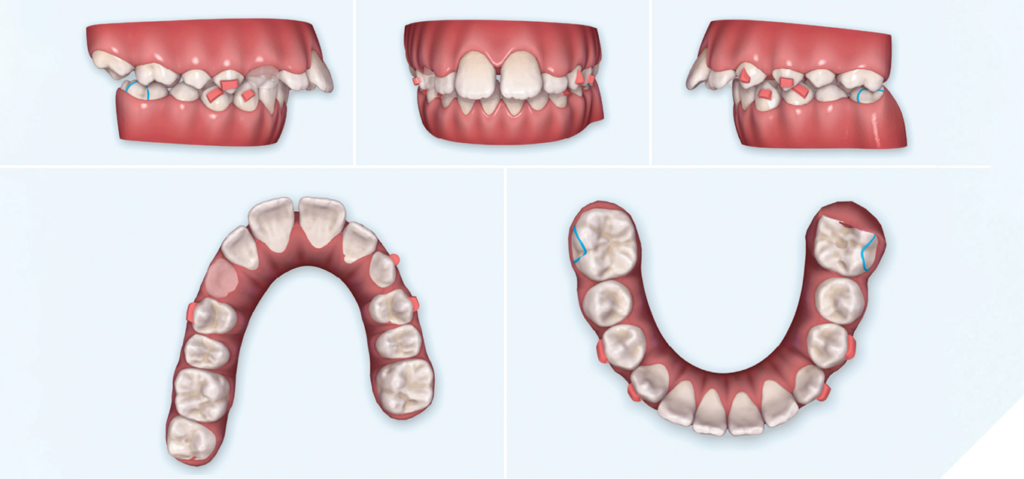
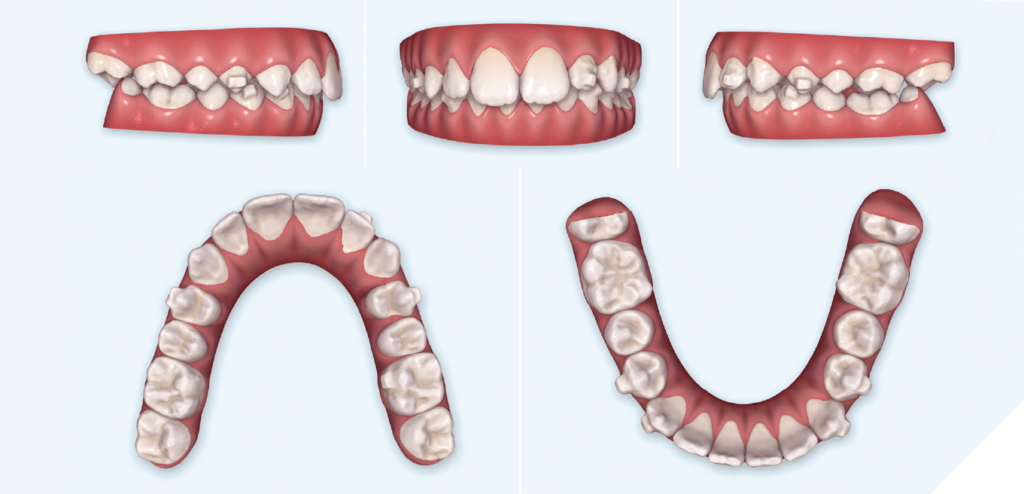
Figs. 16-24: Mandibular Advancement Goal
Figs. 25-27: Progress records

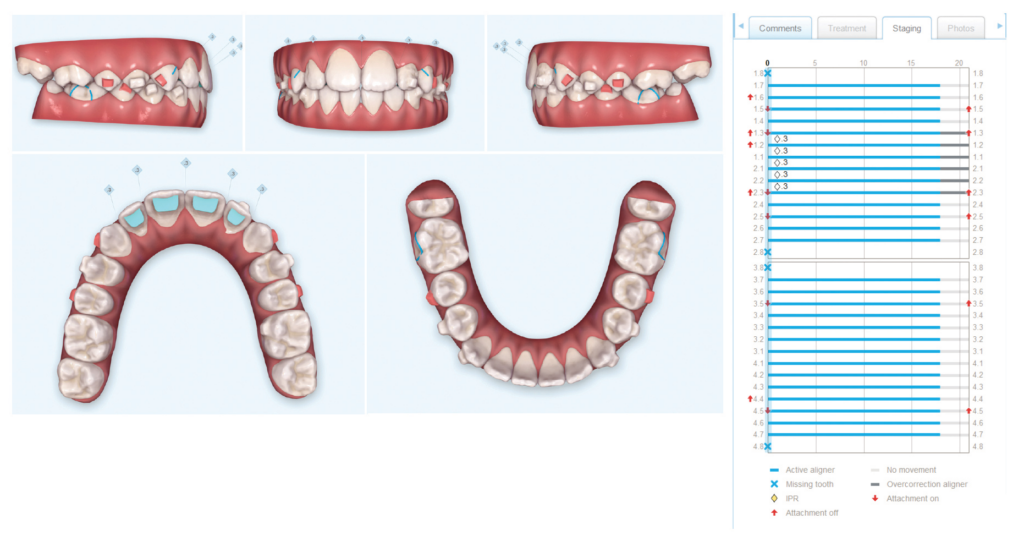
Figs. 28-32
Figs. 33-38
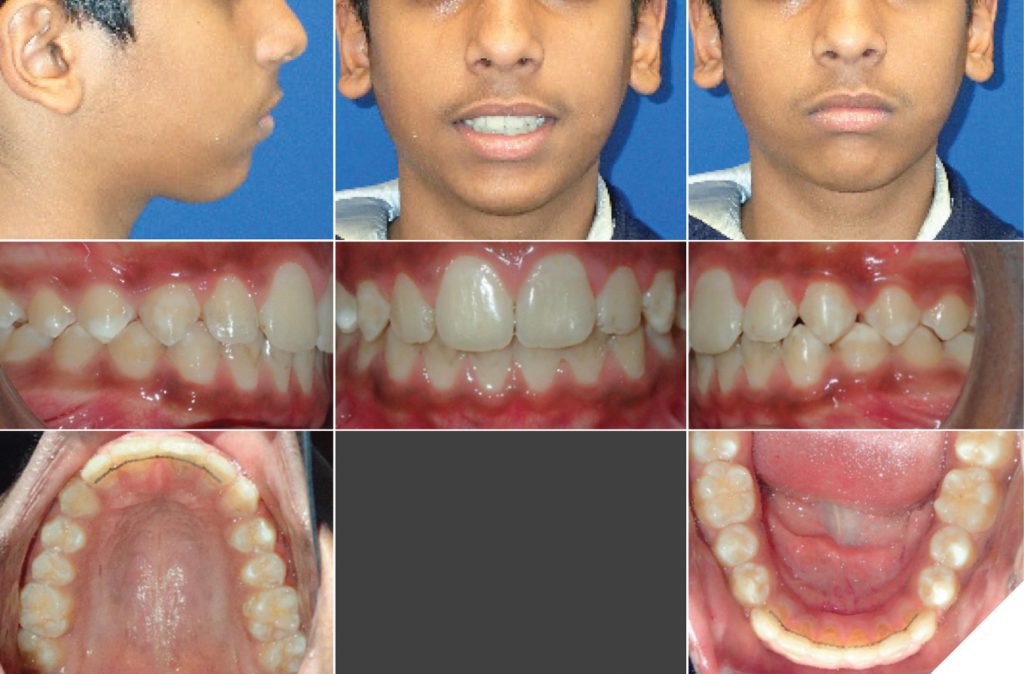
Figs. 39-46: Final Photos
Treatment summary
Number of aligners used:
– Upper: 40 of 64 aligners (16 pre-MA, 24 MA) + 30 of 32 additional aligners as a mid-course correction (MA) +18 additional aligners for detailing.
– Lower: 40 of 64 aligners (16 pre-MA, 24 MA) +30 of 32 additional aligners as a mid-course correction (MA) +18 additional aligners for detailing.
Aligner change interval: weekly, except stages #27-30 of the mid-course correction series (2 weeks each).
Treatment time: 18 months of active aligner treatment. This time does not include 1 month to order the mid-course correction aligners, 2 months of wearing aligners with no precision wings (cut to 4-4 only) followed by 1 month of not wearing any aligners at the end of the MA-phase for passive eruption of the posterior teeth, and 1 month to order the additional aligners for detailing (i.e., 23 months of calendar time from initial aligner delivery to retention).
Appointment scheduling:
– After the initial aligner delivery, the patient was seen at week 8 and at week 16 (since there were 16 pre-MA aligners).
– For the MA aligners with precision wings, we saw the patient every 8 weeks (i.e., before every bite jump increment), in order to ensure proper patient engagement of the precision wings at each new jump. At aligner #40, the precision wings were not engaging on the left side and the aligners were not capturing the upper left lateral incisor, so additional aligners as a mid-course correction were ordered (at no additional lab cost or charge to the patient). The 8-week appointment intervals continued throughout the mid-course correction MA aligners.
– After the MA-phase was completed, the patient wore aligners that were trimmed short with scissors (4-4). These were worn for 2 months, followed by no aligners for 1 month, to give the occlusion time to passively erupt and stabilize before taking the scan for post-MA aligners for detailing.
– During the detailing phase, the patient was seen after 14 weeks (aligners #1-14) and then again a month later (after aligners #15-18). Bonded lingual retainers were then placed on upper 2-2 and lower 3-3.
– An upper clear retainer was made for the patient 5 weeks after the bonded retainers were placed (worn at night only). No other appliances were worn during this 5-week period, in order to give the occlusion the flexibility to settle into place.
• Since the upper incisors were severely proclined initially, buttons for Class II elastics were bonded to the permanent upper lateral incisors and the aligners trimmed short gingivally. The permanent canines had not erupted enough to allow for precision cuts, and engaging precision cuts on the first premolars would have created an undesirable short vertical vector on the first premolars. In the lower arch, buttons were bonded to the lower 6s. 1/4” 4.5 oz. Class II elastics were worn full time during the pre-MA phase.
• 3/16” 4.5 oz. Class II elastics were used full-time during aligners #1-14 of the detailing and finishing phase to help detail and maintain the A-P changes achieved during the mandibular advancement (MA) aligner phase.
Clinical discussion
The patient’s severe Class II malocclusion was successfully corrected to Class I using Invisalign aligners with precision wings for mandibular advancement. The severe deep bite and excessive overjet were also corrected to ideal. The patient’s cooperation was excellent throughout treatment. However, one of the early challenges in this case was that the patient was extremely compliant with his elastics, and the retentive surface area of the aligner around the upper lateral incisors was reduced to accommodate the bonded buttons. As a result, the upper lateral incisors rotated distally out of the aligner, and tracking was lost. For aligners #17-24, we had the patient connect an elastic from upper lateral to upper lateral to mesially rotate them back into the arch. The patient was able to continue with the MA phase up to aligner #40 of 64. By then, however, the lower left first molar was dumping and the precision wing was not engaging anymore. At this point, the upper diastema was closed and the anterior spacing was also closed. The patient was 1/3 cusp Class II on the right and 1/2 cusp Class II on the left. Today, instead of bonding buttons to the upper lateral incisors, we would lasso the Class II elastics around the upper aligner and have the elastics engage the eruption compensation feature on the right, and around the ridge of the interproximal space between the lateral incisor and canine on the left, because avoiding cuts and cutouts in the aligner creates greater aligner plastic adaptation around the teeth for tooth movement control.
To improve the retention of the additional MA aligners for mid-course correction, we manually added a lingual composite attachment to the lower first molars before taking the scan and request on the prescription that these attachments be left alone during the digital detailing process. This was accomplished by modifying the last fitting aligner with thermoforming pliers to create an attachment well, but today we can order lingual attachments for precision wings on molars or premolars (one attachment per quadrant is sufficient) via prescription. By doing this slight modification, the mid-course correction MA aligners were more retentive, and we experienced positive precision-wing engagement.
A lateral open bite from the MA phase was resolved by sectioning aligners #26-30 distal of the 4s to remove the precision wings. For aligners #27-30, the patient wore the “short” 4-4 aligner sections for 2 weeks each. The patient then wore no appliances for 1 month prior to the additional aligner scan for even further bite settling by giving the posterior teeth the overhead clearance needed to erupt into oc¬clusion. No bonded buttons, vertical elastics, or sectional appliances were needed to resolve the open bite (see special clinical section at the end of this case report for additional details).
After the MA-phase was completed, a new scan was taken for additional aligners for detailing, after which lingual retainers were bonded, and another month without appliances was given for the teeth to settle even more and for the curve of Wilson to flatten through daily chewing function. After 1 month, a clear retainer was made for the upper arch to be worn at night only. By creating an environment for the teeth to naturally recover, and by not being too eager to jump in with buttons, vertical elastics or sectional appliances, we were able to efficiently produce an excellent result for a severe Class II patient using Invisalign aligners in a growing teenage patient.
Special clinical section: Managing lateral open bites in growing patients treated with mandibular advancement aligners
When the mandible advances from Class II to Class I, the depth of the curve of Spee can become visibly obvious, particularly if the lower arch is not yet fully leveled. A posterior open bite during mandibular advancement treatment can be a common phenomenon with twin block therapy.1,2 Nevertheless, seeing this happen during treatment can be alarming to those not familiar with how best to manage this common side effect.
Do not be too eager to correct the situation with vertical elastics and buttons or with sectional fixed appliances. Instead, leverage the fact that the occlusion of growing patients is quite adaptable at this stage. Most teeth are still capable of erupting at a rapid but physiologically healthy rate. The key here is to give the dentition the overhead clearance necessary for the bite to naturally settle into place. Instead of jumping in with an orthodontic solution, our preferred approach is to not interfere with the natural ability for the teeth to erupt on their own. This is accomplished by leaving the teeth uncovered once the desired overbite and overjet have been achieved.
To do this, we will trim the last 4 or 5 aligners of the mandibular advancement (MA) series with crown and bridge scissors to remove the precision wings (often times, these are the passive transitional stages at the end of the series). Each “short” aligner section spanning 4-4 will be worn for 2 weeks each, for a total of 8-10 weeks with the molars uncovered and therefore free to erupt and close the bite. Any retention attachments present on 4-4 should adequately keep the aligner secured in place. After the last “short” aligner, the patient will discontinue all appliance wear for 1 month. During this month, the teeth will have additional freedom to settle into a more stable position.
At the end of the month, we will scan their teeth for additional aligners for detailing. When these aligners are finished, we will bond a lingual wire 2-2 in the upper arch and 3-3 in the lower arch. The patient will discontinue wearing any appliances for another full month in order to let the bite settle even more. When the patient returns to our office after a month, we will order them an upper clear retainer for night-time wear.
 Figs. 47-49: Case Examples

Figs. 50-52

Figs. 53-55

Figs. 56-58

Oral Health welcomes this original article.
Disclosure: The author was paid an honorarium by Align Technology, Inc. for his time to develop this article..
Reprinted with permission from Align Technology, Inc.
References
- Clark, W., Design and Management of Twin Blocks: Reflections after 30 Years of Clinical Use, J Orthod, Sep 2010, 37(3):209-16.
- Singh, H. et. al., Modified Occlusal Settling Appliance in Twin Block Therapy, J Clin Diag Res, 2016 Sep; 10(9): ZH01–ZH02. Published online 2016 Sep 1. doi: 10.7860/JCDR/2016/20028.8467.
About the Author

Dr. Iwasiuk has been in private practice since 2002 and has treated patients with Invisalign aligners since his orthodontic residency training. He achieved Elite Provider status in 2012 and continues to push the limits of what can be accomplished with clear aligners. He received his DDS from the University of Toronto and his orthodontic certificate from the University of Rochester. His interest in multidisciplinary dentistry stems from spending two years at the University of Washington and being influenced by the Seattle Study Club. He is a keynote speaker, a research consultant, and a key opinion leader on Align Technology’s Mandibular Advancement Clinical Expert Panel. He is an Invisalign Diamond Provider practicing in the Greater Toronto area.